
[네이버 부스트 캠프] AI-Tech-re - week4(3)
학습기록 - 17
오늘 한 일
- 강의 o
- ai-stages : 모델 정의
- 백준 알고리즘 - 가운데 수 & bfs 알고리즘
- 개인 회고
1. 강의 복습 내용
강의
Model1 - 파이토치
Pytorch : low-level, Pythonic, Flexibility
training이 어떻게 이루어져있는지 각각 정의가 되어있다. (loss, optim, .. )
-
nn.Module
Init을 통해서 모델 객체를 정의한다.
a = MyModel() : Modules를 상속하는 Model 정의
list(a.modules()) : 모든 modules를 다 출력하며, Parameter의 정보를 알 수 있다.
nn.Module을 상속받은 모든 클래스는 child Class를 가진다. → 그 ‘모델’에 연결된 모든 module을 확인할 수 있다. Backward에서 모듈에 접근해서 다시 이용할 수 있다. (재사용) -
Forward
init에서 초기화했던 Module들을 이용해서 forward Prop 진행
위의 얘기대로라면, conv1, conv2는 모듈을 상속받았기 때문에 forward 함수 또한 존재한다. ( 아래 함수는 pytorch doc) 이렇게 되면 계속해서 재사용이 가능하게 된다.
suepr(class, self).init() 에 대한 설명 https://sirzzang.github.io/dev/Dev-python-super/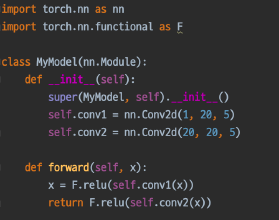
-
Parameters
nn.modules안에 Parameter들은 모델에 정의되어 있는 모든 modules가 가지고 있는 Parmeter를 의미한다. (상속) 이 parameter들은 각각 tensor들로 구성 되어있으며, forward 시, 계산에 쓰이게 된다.
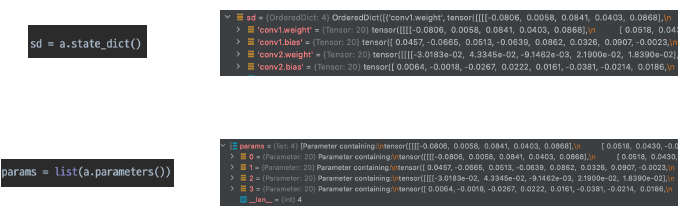
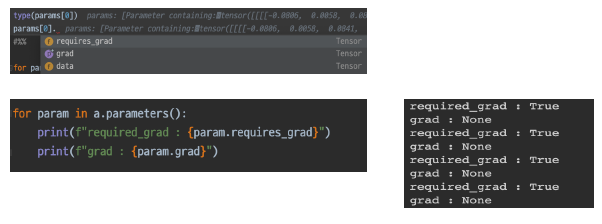
또한, 이 각각의 Parameter들은 멤버 변수들을 가지고 있다. 대표적으로 data, grad, requires_grad 등을 가짐.
이렇게 세세하게 찾아볼 수 있으면서, 오류가 생길 시, 핸들링 가능하고 cutomizing 가능하다. (ex, freeze)
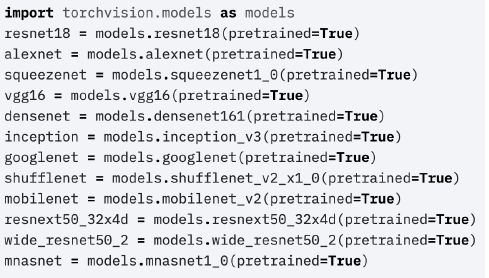
Model2 - Pretained Model
좋은 품질, 대용량의 데이터로 미리 학습한 모델 → 내 목적에 다듬어서 사용하자. 방법? torchvision.models를 이용해서 쉽게 다운로드 가능하다.
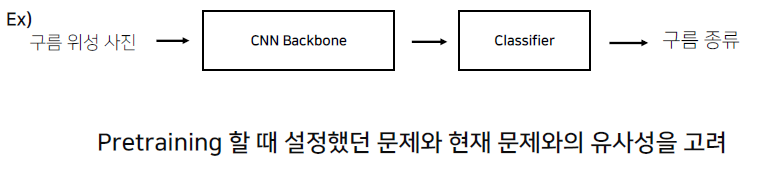
Transfer Learning - CNN base 모델 구조 ( simple )

다음과 같이 Backbone 과 Classifier는 이전에 module을 확인하는 것처럼 모델을 print한다.
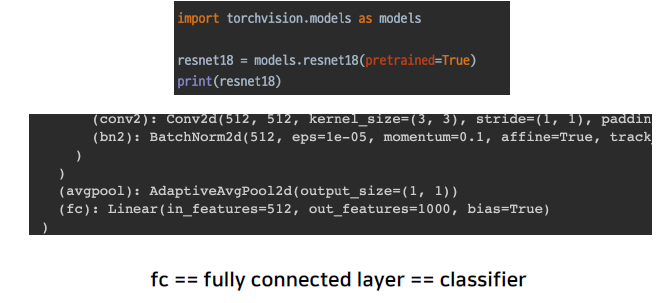
여기서 보면 outfeature가 1000인 것을 볼 수 있다. 즉, 이건 1000개의 클래스로 나눠진다는 것이다.
여기서 중요할 점은 이 ImageNet의 모델이 어떤 의미로 classify를 했는지가 중요하다. 여기서는 이미지가 어떤 이미지인지 알려주는 모델인 것을 알 수 있다.

case1. 학습 데이터가 충분한 경우,
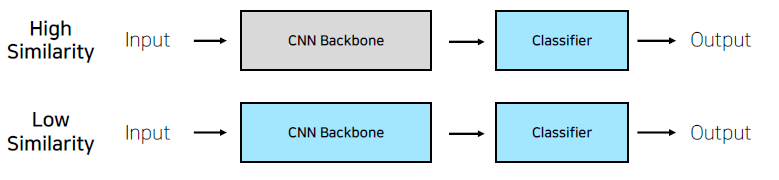
유사도가 높은 경우, Backbone을 굳이 다시 학습시키는 것보다는 Pretained Model을 그대로 이용하고 classfier만 수정해주자. (feature extraction : Backbone feature를 고정하고 Classifier만 추출해서 바꾼다.)
유사도가 낮은 경우, Pretained-model이 아예 연관성이 없더라도 No-base model보다는 어느 정도 성능이 나오게 된다. Backbone을 다시 학습시키는 것과 함께 Classifier를 이용해서 분류를 한다. (fine tuning : 미세 조정, 모든 feature를 조정하는 방식)
case2. 학습 데이터가 충분하지 않을 경우,
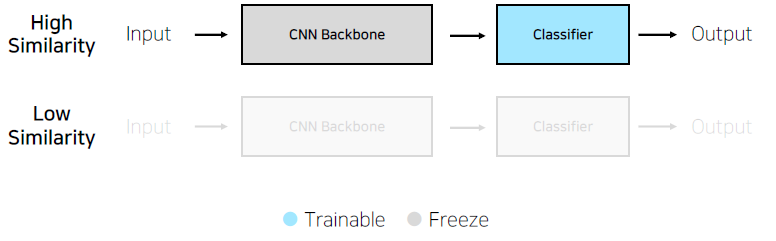
유사도가 높은 경우, 적은 데이터로도 그나마 괜찮은 성능이 가능하다.
유사도가 낮을 경우, 하는 것을 추천하지는 않는다.
2. 고민 내용, 결과 (과제 수행 과정, 결과물 정리)
과제
Dataset
-
어제 했던 Dataset의 설정이 잘못되었다는 것을 다른 분들이 이야기하는 것을 통해 알았다. 확장자명이 .jpg만 있는게 아니라 jpeg, png도 있다는 것을 알았고, os.listord를 이용해서 숨김파일과 ipynb 체크포인트 파일을 제외한 path_name들을 설정했고 DataFrame으로 만들어줬다.
-
이 DataFrame을 Dataset에 갖고 가서 각 열별로 호출하게 만들어줬다.
#Test Dataset

class TrainDataset(Dataset):
    def __init__(self, new_data, transform):
        self.transform = transform
        self.img_paths = new_data.image_paths
        self.y = new_data.class_num
        self.classes = pd.unique(self.y)

    def __getitem__(self, index):
        X = Image.open(self.img_paths[index])
        y = self.y[index]
        print(X.size)
        if self.transform:
            X = self.transform(X)
            print(X.size())
        return torch.as_tensor(X, dtype=torch.float), torch.tensor(y, dtype=torch.long)

    def __len__(self):
        return len(self.img_paths)
#change_imgPath
def change_imgPath(train_dir):
    train = pd.read_csv(os.path.join(train_dir, 'train.csv'))
    image_dir = os.path.join(train_dir, 'images')
    image_folder_dir = [os.path.join(image_dir, img_path) for img_path in train.path]

    #image path 생성
    image_paths = []
    image_column = []
    for i, image_dir in enumerate(image_folder_dir):
        k = os.listdir(image_dir)
        for img_name in k:
            if "._" in img_name or ".ipynb" in img_name:
                continue
            else:
                image_column.append(img_name)
                image_paths.append(os.path.join(image_dir, img_name))

    # 조건문 이용해서 클래스 생성
    condi_list = []
    class_column = []

    for path in image_paths:
        condi = [path.split("/")[-2].split("_")[1], int(path.split("/")[-2].split("_")[3])]
        name = path.split("/")[-1]
        condi_list.append([condi, name])

    for condi in condi_list:
        if "incorrect" in condi[1]:
            start = 6
        elif "mask" in condi[1]:
            start = 0
        else:
            start = 12

        if condi[0][0] == "female":
            start += 3
            if 30 <= condi[0][1] < 60:
                start += 1
            elif 60 <= condi[0][1]:
                start += 2
        else:
            if 30 <= condi[0][1] < 60:
                start += 1
            elif 60 <= condi[0][1]:
                start += 2
        class_column.append(start)

    # img path & img name(mask) & class name 생성
    new_data = pd.DataFrame(image_paths, columns=["image_paths"])
    new_data["image_name"] = image_column
    new_data["class_num"] = class_column
    return new_data
Dataset 내에서 class값 설정 및 y값 설정?
이미지당 class가 찍혀야 하는데 자꾸 안맞았다. → y[index] 값으로 하나씩 빼주도록 한다. y = self.y[index]
모델 학습?
- ResNet 모델 이용, 이전에 Transfer Learning 에서 배웠던 학습모델 이용해서 학습하고자 한다.
-
“mat1 dim 1 must match mat2 dim 0” 이런 에러가 떴는데.. 왜그런가?
→ model의 마지막 Linear의 input과 output의 size가 제대로 안맞았다. fully connected layer를 (512, 18, bias=True) 로 변경
- 왜 학습을 하는데 자꾸 print가 되는 것인지.. → Dataset에 print를 넣었다..
- 정확도 결과는 67프로 정도가 나왔다. f1은 feature라는 뜻인가?

- 정확도를 높이기 위해서 해야할 일,,, Image Data를 Augmentation을 이용해서 좀 더 만들어야할까? & 다른 모델 사용 &
모델의 ResNet코드는 이전에 했던 Tranfer Learning 선택과제를 이용했다.
mnist_resnet18 = torchvision.models.resnet18(pretrained=True)
mnist_resnet18 = mnist_resnet18.to(device)
mnist_resnet18.fc = torch.nn.Linear(512, 18, bias=False)
# print("네트워크 필요 입력 채널 개수", mnist_resnet18.conv1.weight.shape[1])
# print("네트워크 출력 채널 개수 (예측 class type 개수)", mnist_resnet18.fc.weight.shape[0])
# print("네트워크 구조", mnist_resnet18)
## train 데이터 셋을 MyModel에 학습하기

device = torch.device("cuda:0" if torch.cuda.is_available() else "cpu") # 학습 때 GPU 사용여부 결정. Colab에서는 "런타임"->"런타임 유형 변경"에서 "GPU"를 선택할 수 있음

print(f"{device} is using!")

mnist_resnet18.to(device) # Resnent 18 네트워크의 Tensor들을 GPU에 올릴지 Memory에 올릴지 결정함

LEARNING_RATE = 0.0001 # 학습 때 사용하는 optimizer의 학습률 옵션 설정
NUM_EPOCH = 5 # 학습 때 mnist train 데이터 셋을 얼마나 많이 학습할지 결정하는 옵션

loss_fn = torch.nn.CrossEntropyLoss() # 분류 학습 때 많이 사용되는 Cross entropy loss를 objective function으로 사용 - https://en.wikipedia.org/wiki/Cross_entropy
optimizer = torch.optim.Adam(mnist_resnet18.parameters(), lr=LEARNING_RATE) # weight 업데이트를 위한 optimizer를 Adam으로 사용함

dataloaders = {
    "train" : loader,
    #"test" : mnist_test_dataloader
}
### 학습 코드 시작
best_test_accuracy = 0.
best_test_loss = 9999.

for epoch in range(1):
    for phase in ["train"]:
        running_loss = 0.
        running_acc = 0.
        if phase == "train":
            mnist_resnet18.train() # 네트워크 모델을 train 모드로 두어 gradient을 계산하고, 여러 sub module (배치 정규화, 드롭아웃 등)이 train mode로 작동할 수 있도록 함
#         elif phase == "test":
#             mnist_resnet18.eval() # 네트워크 모델을 eval 모드 두어 여러 sub module들이 eval mode로 작동할 수 있게 함

        for ind, (images, labels) in enumerate(tqdm(dataloaders[phase])):
          # (참고.해보기) 현재 tqdm으로 출력되는 것이 단순히 진행 상황 뿐인데 현재 epoch, running_loss와 running_acc을 출력하려면 어떻게 할 수 있는지 tqdm 문서를 보고 해봅시다!
          # hint - with, pbar
            images = images.to(device)
            labels = labels.to(device)

            optimizer.zero_grad() # parameter gradient를 업데이트 전 초기화함

            with torch.set_grad_enabled(phase == "train"): # train 모드일 시에는 gradient를 계산하고, 아닐 때는 gradient를 계산하지 않아 연산량 최소화
                logits = mnist_resnet18(images)
                _, preds = torch.max(logits, 1) # 모델에서 linear 값으로 나오는 예측 값 ([0.9,1.2, 3.2,0.1,-0.1,...])을 최대 output index를 찾아 예측 레이블([2])로 변경함
                loss = loss_fn(logits, labels)

                if phase == "train":
                    loss.backward() # 모델의 예측 값과 실제 값의 CrossEntropy 차이를 통해 gradient 계산
                    optimizer.step() # 계산된 gradient를 가지고 모델 업데이트

            running_loss += loss.item() * images.size(0) # 한 Batch에서의 loss 값 저장
            running_acc += torch.sum(preds == labels.data) # 한 Batch에서의 Accuracy 값 저장

        # 한 epoch이 모두 종료되었을 때,
        epoch_loss = running_loss / len(dataloaders[phase].dataset)
        epoch_acc = running_acc / len(dataloaders[phase].dataset)

        print(f"현재 epoch-{epoch}의 {phase}-데이터 셋에서 평균 Loss : {epoch_loss:.3f}, 평균 Accuracy : {epoch_acc:.3f}")
        if phase == "test" and best_test_accuracy < epoch_acc: # phase가 test일 때, best accuracy 계산
            best_test_accuracy = epoch_acc
        if phase == "test" and best_test_loss > epoch_loss: # phase가 test일 때, best loss 계산
            best_test_loss = epoch_loss
print("학습 종료!")
print(f"최고 accuracy : {best_test_accuracy}, 최고 낮은 loss : {best_test_loss}")
3. 피어세션 정리
- 강의 요약 : Model1 - Module의 의미와 그 안의 기능들 & Model2 - Pretained Model(Transfer Learning) 을 이용할 때, 어떻게 이용해야 할까?
- 알고리즘 : 바이러스 2606번
- 멘토님 Dataset Labeling
- 자습
4. 학습 회고
-
ResNet Model을 torchvision을 통해 가져오고 Pretained 상태로 Train만 시켰는 데 submission의 정확도가 약 67%로 나왔다. 일반 Train을 했을 때, 정확도가 99프로가 나왔기 때문에 아마 overfitting 되지 않았을까 생각이든다. 그래서 Train과 Test set을 나눠서 시도해봐야겠다는 생각이 들었다.
오늘 하려 했으나.. 될지 잘 모르겠다. -
어제, 그제 Data를 어떻게 이용해야할 지 감조차 안와서 멀뚱멀뚱한 상태로 코드를 보기만 하다가, 그냥 모르겠다 싶어서 생각나는 대로 짰다. 물론 제대로 되지 않았다. 기본적인 pandas의 메소드를 잘 몰랐고 그냥 구글링으로 되는 함수를 아무거나 짰기 때문이다. 결국엔 결과물을 만들었다. 다른 분들의 쉽게 짠 코드를 보면 약간의 열등감을 느꼈던 것 같다. 그런데 가만 생각해보면, 누구나 처음은 계속 힘들 것이고 완벽할 수 없다. 나는 계속 완벽한 코드를 원해서 시작을 못했던 것 같다. 이제는 이 길이 아닌 것 같더라도 짜보면서 성장해야겠다.